
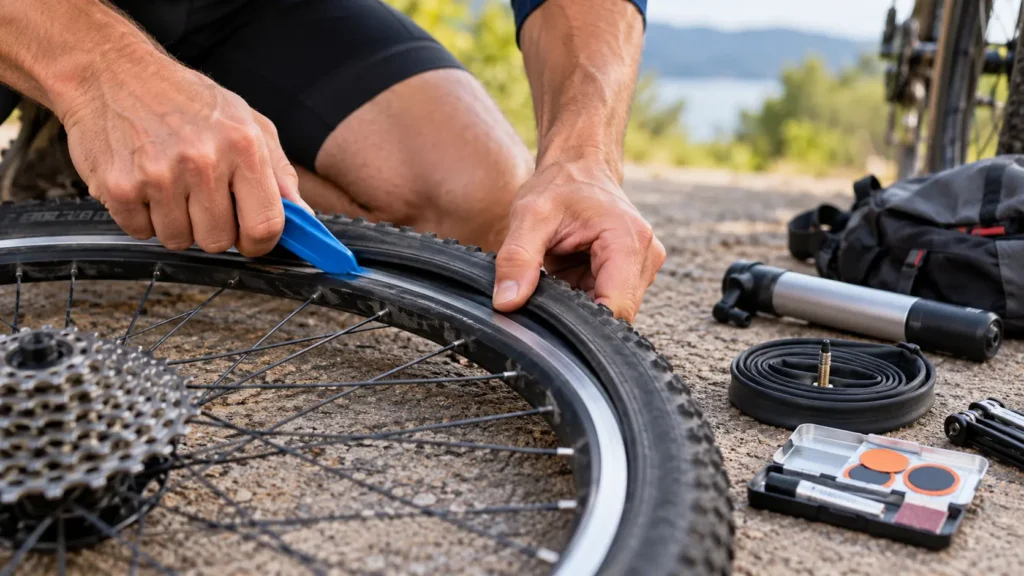
A flat bike tire can be frustrating, especially when you’re mid-ride or getting ready to head out. Whether you’re commuting to work, exploring a local trail, or enjoying a weekend ride, a punctured tire can quickly interrupt your plans.
The good news? Learning how to fix a flat bike tire is easier than you might think. With a few basic tools and a little patience, you can repair many common punctures at home without visiting a bike shop.
Flat tires happen for several reasons. Sharp objects like glass, thorns, or small metal pieces can puncture an inner tube. Riding with insufficient tire pressure can also cause pinch flats when the tire compresses against the rim after hitting a pothole or other obstacle.
Whatever caused the problem, knowing how to repair a flat is an essential skill for every cyclist.
In this guide, we’ll walk you through the entire process, from removing the wheel and finding the puncture to repairing or replacing the inner tube and getting your bike ready to ride again.
Note: This guide focuses on bicycles with conventional tires that use inner tubes. Tubeless bicycle tires require a different repair approach.
Table of Contents
Quick Answer: How Do You Fix a Flat Bike Tire?
To fix a flat bike tire, follow these seven steps:
- Remove the wheel from your bicycle.
- Deflate the tire completely and remove one side of the tire from the rim.
- Take out the inner tube and locate the puncture.
- Inspect the tire for glass, thorns, or other sharp objects.
- Patch the damaged tube or replace it with a compatible new one.
- Reinstall the tube and tire, then inflate to the appropriate pressure.
- Reattach the wheel and check that everything is secure before riding.
For most ordinary punctures, this process is straightforward once you’ve learned the basics. The following sections explain each step in more detail.
What You’ll Need to Fix a Flat Bike Tire
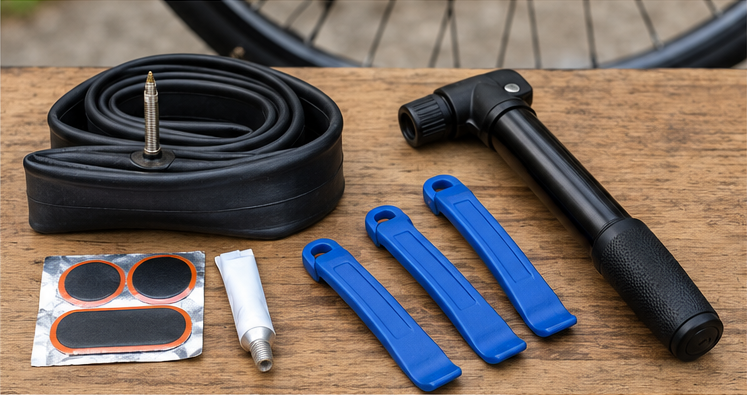
Before starting the repair, gather a few essential tools. Having everything within reach will make the job easier and help you avoid unnecessary interruptions.
Fortunately, you don’t need a professional bicycle workshop. Most basic flat-tire repairs can be completed with a small collection of affordable tools.
1. Tire Levers
Tire levers are small tools designed to help remove the tire bead from the wheel rim.
Bicycle tires usually fit tightly around the rim, making them difficult to remove with your fingers alone. A tire lever allows you to carefully lift one side of the tire over the rim without applying excessive force.
Plastic tire levers are a practical choice for beginners because they’re lightweight, inexpensive, and generally less likely to scratch the rim than metal tools.
A set of two or three tire levers is usually sufficient for most standard bicycle tires.
Tip: Avoid using screwdrivers, knives, or other sharp metal objects to remove a tire. These can damage the inner tube, tire bead, or wheel rim.
2. Bicycle Pump
A reliable bicycle pump is essential for inflating the repaired or replacement inner tube.
There are two common types of bicycle pumps:
- Floor pumps: Larger pumps designed for home use. They’re generally easier to operate and often include a pressure gauge.
- Mini pumps: Compact, portable pumps that can fit inside a cycling bag or attach to the bicycle frame.
For repairs at home, a floor pump with a pressure gauge is usually the more convenient option.
Before purchasing a pump, check which valve type your bicycle uses.
The two most common valve types are Presta and Schrader. Presta valves are narrower and commonly found on road bikes, while Schrader valves resemble the valves used on car tires and are common on many recreational bicycles.
Some pumps support both valve types, while others require an adapter or a different pump head.
Tip: Choose a pump with a clear pressure gauge and compatibility with your bicycle’s valve.
3. Spare Inner Tube or Patch Kit
Once you’ve located the puncture, you’ll need either a replacement inner tube or a patch kit.
A spare inner tube is often the quickest and most reliable solution, particularly if the existing tube has multiple punctures or significant damage.
When buying a replacement, make sure it matches your tire’s diameter, falls within the tube’s supported width range, and has the appropriate valve type and length.
A patch kit is another useful option. Most kits contain rubber patches and preparation materials, while traditional vulcanizing kits also include vulcanizing fluid.
Patching can be a cost-effective way to repair small punctures, especially when the rest of the tube remains in good condition.
However, not every puncture is suitable for patching. Large tears, badly damaged tubes, or failures near the valve base generally require replacement.
For convenience, consider keeping both a spare inner tube and a patch kit in your cycling repair supplies.
4. Optional Tools and Accessories
A few additional items can make the repair process easier:
- Clean cloth: For wiping dirt from the tire and wheel.
- Small container of water: Useful for identifying air leaks by looking for bubbles.
- Marker: Helps identify the puncture location before applying a patch.
- Wrench: May be required if your bicycle has wheels secured with axle nuts.
- Bike repair stand: Optional equipment that can make wheel removal and maintenance more comfortable.
You don’t need to purchase every accessory immediately. Tire levers, a compatible pump, and a spare tube or patch kit are enough for many basic repairs, provided you also have the necessary tool to remove your wheel.
How to Fix a Flat Bike Tire in 7 Steps
Now that you have the necessary tools, it’s time to repair the flat.
The process may seem complicated at first, but each step is relatively simple when completed carefully.
Find a clean, well-lit workspace where you can place your bicycle and organize your tools. If possible, work somewhere with enough room to remove and inspect the wheel comfortably.
Follow these seven steps to repair a conventional bicycle tire that uses an inner tube.
Step 1: Remove the Wheel from Your Bike
The first step is to remove the wheel with the flat tire.
The exact process depends on your bicycle’s wheel attachment system.
For bikes with a quick-release lever:
- Position your bicycle securely.
- If you’re removing the rear wheel, shift to the smallest rear cog before taking the wheel off.
- Open the quick-release lever.
- If necessary, loosen the adjusting nut enough to remove the wheel.
- Carefully remove the wheel from the frame or fork.
For bikes with a thru-axle:
Follow your bicycle manufacturer’s instructions to loosen and remove the axle using the appropriate lever or tool.
For bikes with axle nuts:
Use the correct wrench to loosen the axle nuts before removing the wheel.
If your bicycle has rim brakes, you may need to release the brake mechanism to create enough clearance.
For disc-brake bicycles, avoid squeezing the brake lever while the wheel is removed unless a suitable pad spacer is installed. This helps prevent the brake pads from closing together.
If you have an e-bike or a bicycle with a hub motor, consult the manufacturer’s instructions before disconnecting components or removing the wheel.
Beginner tip: If you’re removing a rear wheel, take a quick photo of the chain and derailleur arrangement before disassembly. It can help when reinstalling the wheel.
Step 2: Deflate the Tire and Remove One Tire Bead
Once the wheel is removed, release any remaining air from the tire.
Even if the tire looks completely flat, some air may remain inside the tube.
If your bicycle has a Schrader valve, press the small pin in the center of the valve to release the air.
For a Presta valve, unscrew the small nut at the tip of the valve before pressing it to release air.
If the valve has a retaining nut against the rim, remove it before taking out the tube.
Next, use your hands to push the tire beads toward the center channel of the rim. This creates additional slack and makes the tire easier to remove.
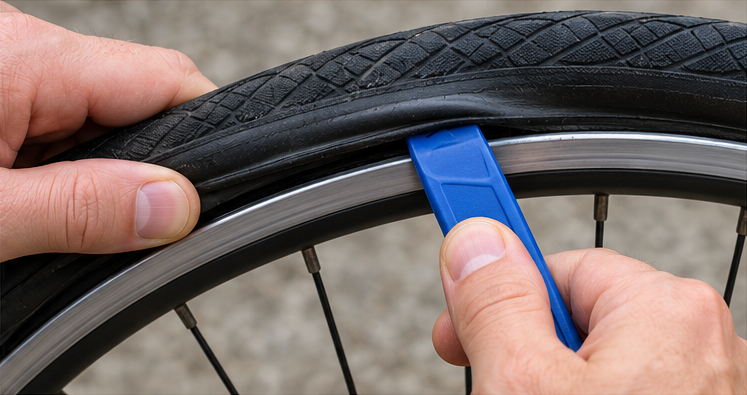
Insert a plastic tire lever beneath one side of the tire bead and gently lift it over the rim.
If necessary, insert a second lever a short distance away and continue working around the rim until one side of the tire is free.
You usually don’t need to remove the entire tire from the rim to replace an inner tube.
Important: Don’t force the tire lever or use sharp metal objects. Excessive pressure can damage the tire bead, inner tube, or rim.
Step 3: Remove the Inner Tube and Find the Puncture
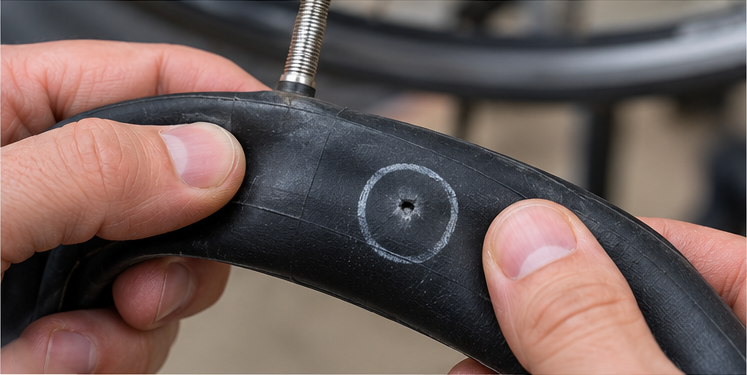
With one side of the tire loosened, carefully pull the inner tube out.
Start opposite the valve and work your way around the wheel. Remove the valve from the rim hole once the rest of the tube is free.
Before discarding the tube or installing a replacement, try to determine what caused the flat.
Finding the original puncture is important because a piece of glass or a thorn may still be stuck inside the tire.
There are several ways to locate a puncture.
Method 1: Listen for escaping air
Inflate the removed inner tube slightly until it expands enough to reveal a leak.
Bring the tube close to your ear and slowly rotate it, listening for a faint hissing sound.
Method 2: Feel for escaping air
Move your hand close to the inflated tube and check whether air is escaping from a particular location.
Method 3: Use water to find the puncture
If the leak is difficult to locate, submerge sections of the slightly inflated inner tube in a container of water.
Watch for a steady stream of small bubbles. These indicate where air is escaping.
Once you’ve found the leak, mark its location so it’s easy to identify later.
Inspect the shape of the damage as well. A tiny hole often indicates a sharp-object puncture, while two parallel holes may indicate a pinch flat caused by the tube being compressed against the wheel rim.
If the damage is near the valve or the tube has a large tear, replacement is generally the better option.
Step 4: Inspect the Tire for Sharp Objects
Before installing a repaired or new inner tube, inspect the tire carefully.
This step is especially important because the object that caused the original puncture may still be embedded in the tire.
Start by checking the outside tread for visible damage.
Look for:
- Small pieces of glass
- Thorns or sharp plant material
- Metal fragments
- Nails or other road debris
- Deep cuts or damaged rubber
Next, inspect the inside of the tire casing using a cloth and visual examination. If you need to feel for hidden debris, do so very carefully because sharp objects can cut your fingers.
Remove any foreign objects using appropriate tools, such as tweezers.
Also inspect the rim tape inside the wheel. The tape should cover the spoke holes and protect the inner tube from exposed spoke ends or sharp rim edges.
If the tape is damaged or out of position, repair that issue before reinstalling the tube.
Check the tire sidewalls and bead for serious damage. A large cut, exposed casing, or damaged bead may mean the tire itself needs replacement.
Important: Installing a new inner tube without removing the original cause of the puncture can result in another flat almost immediately.
Step 5: Patch the Inner Tube or Install a New One
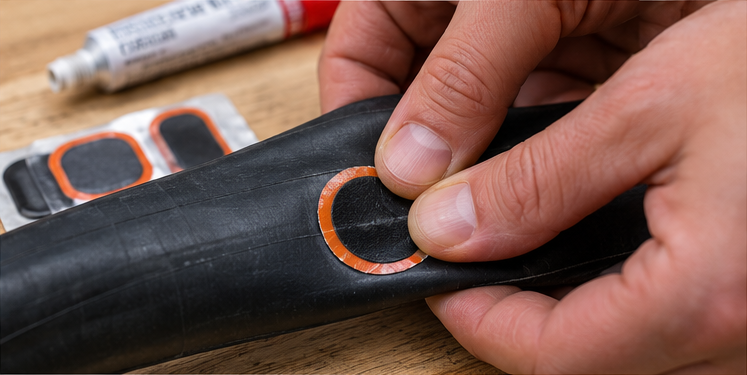
Once you’ve identified the puncture and inspected the tire, decide whether to repair the existing tube or replace it.
Option A: Patch the existing inner tube
For a small puncture in an otherwise healthy tube, a patch kit can be an effective solution.
Follow these general steps:
- Locate and mark the puncture.
- Clean and dry the damaged area.
- Prepare the tube surface according to your patch kit’s instructions.
- If using a vulcanizing patch kit, apply the fluid and allow it to dry as directed.
- Position the patch over the puncture.
- Press the patch firmly for the recommended time.
- Check that the patch is properly attached before reinstalling the tube.
Different patch kits have different application requirements, so always follow the instructions included with your kit.
Option B: Replace the inner tube
If the tube is badly damaged or you prefer a faster repair, install a new one.
Confirm that the replacement is compatible with your tire size, valve type, and rim depth.
Add just enough air to the new inner tube for it to hold its shape. This makes installation easier and helps reduce the risk of twisting or pinching.
Beginner tip: Keeping a spare inner tube available is one of the simplest ways to avoid lengthy delays during a ride.
Step 6: Reinstall the Tire and Inflate Correctly
After patching or replacing the tube, carefully reinstall it inside the tire.
Start by inserting the valve through the valve hole in the rim.
Make sure the valve sits straight rather than leaning at an angle.
Gently place the rest of the slightly inflated inner tube inside the tire, checking that it isn’t twisted.
Next, push the loosened tire bead back onto the rim using your hands.
Work gradually around the wheel, keeping the tire bead in the rim’s center channel where possible. This creates slack and makes the final section easier to install.
Avoid using tire levers during installation unless necessary, because they can pinch or puncture the tube.
Before inflating, inspect both sides of the tire to make sure no part of the inner tube is trapped between the tire bead and rim.
Begin inflating slowly.
After adding a small amount of air, check that the tire bead is seated evenly around the entire wheel.
If the tire looks uneven or begins bulging, stop inflating, release the air, and correct the seating before continuing.
Once everything looks properly aligned, inflate to a pressure appropriate for your tire, rim, and riding conditions, following the manufacturer’s specifications.
Do not exceed the maximum permitted pressure of the tire or rim, whichever is lower.
A floor pump with a pressure gauge makes this process considerably easier.
Step 7: Reinstall the Wheel and Check Before Riding
With the repaired tire properly inflated, reinstall the wheel on your bicycle.
Make sure the axle is fully seated in the frame or fork and secured according to the manufacturer’s instructions.
For quick-release systems, close the lever correctly and confirm that the wheel is securely clamped.
For thru-axles or axle nuts, follow the specified installation and tightening instructions.
If you released your rim brake earlier, reconnect it.
If your bike has disc brakes, guide the brake rotor carefully between the brake pads while reinstalling the wheel.
Once the wheel is installed:
- Spin it gently to check for rubbing or unusual movement.
- Squeeze the brake lever to confirm normal braking operation.
- Check that the wheel is securely attached.
- Inspect the tire one last time for uneven seating or bulges.
- Confirm that the tire is holding air.
If you removed the rear wheel, verify that the chain is correctly positioned and the gears function normally.
Only ride once you’re confident that the wheel, brakes, and tire are secure.
Congratulations! You’ve completed the basic process of fixing a flat bike tire.
With a little practice, you’ll become more comfortable with the repair and better prepared for unexpected punctures.
Should You Patch or Replace a Bike Inner Tube?
When repairing a flat bicycle tire, one of the most common questions is whether to patch the damaged inner tube or replace it entirely.
Both methods can work, but the best choice depends on the type of damage, the condition of the tube, and the repair supplies available.
When Should You Patch an Inner Tube?
Patching is a practical choice when the tube has a small, isolated puncture and is otherwise in good condition.
For example, if a thorn or small piece of glass creates a tiny hole, a properly applied patch can restore the tube’s ability to hold air.
Advantages of patching:
- Usually costs less than buying a replacement tube.
- Reduces waste by extending the life of an existing tube.
- Makes use of a compact repair kit.
- Can be effective for small punctures when applied correctly.
However, patching takes some preparation and may require drying or curing time, depending on the kit.
The tube also needs a clean, suitable surface so the patch can bond correctly.
When Should You Replace an Inner Tube?
Replacing the tube is generally the more dependable choice when the damage is too extensive for a straightforward patch.
Consider replacing it when:
- The tube has a large tear or split.
- The valve stem, or its base, is damaged.
- The tube has multiple significant defects.
- The rubber is deteriorated or brittle.
- A previous patch is failing, and the surrounding tube is damaged.
A replacement tube is also a convenient option when you need to complete the repair quickly.
Make sure the replacement matches the bicycle’s tire size and valve requirements.
Patching vs. Replacing: Quick Comparison
| Factor | Patching | Replacing |
|---|---|---|
| Best for | Small, repairable punctures | Major damage or quick replacement |
| Cost | Usually lower per repair | Requires a new tube |
| Time | Requires preparation and application | Often faster with a spare available |
| Reliability | Good when correctly applied | Generally more dependable |
| Waste | Extends tube life | Creates an old tube for disposal or recycling |
| Beginner-friendly | Requires some practice | Usually straightforward |
Which Option Is Better for Beginners?
For beginners, keeping a compatible spare inner tube is often the most practical approach.
Replacing a punctured tube removes the need to apply a patch immediately, making the repair process simpler when you’re unfamiliar with the equipment.
However, learning to use a patch kit is still valuable. It can save money over time and provides a useful backup when you don’t have a spare tube available.
Our recommendation: Carry both a spare tube and a small patch kit whenever possible. Use the spare for a quick replacement and repair the punctured tube later if the damage is suitable for patching.
Remember that patching or replacing the inner tube won’t solve a problem caused by a badly damaged tire, exposed spoke ends, or faulty rim tape. Always correct the underlying issue before riding again.
Common Mistakes to Avoid When Fixing a Flat Bike Tire
Fixing a flat bike tire is a relatively simple task, but a few common mistakes can turn a quick repair into another frustrating puncture.
If you’re repairing a bicycle tire for the first time, pay attention to these mistakes and learn how to avoid them.
1. Forgetting to Check for Sharp Objects
One of the biggest mistakes cyclists make is installing a new inner tube without checking what caused the original puncture.
A small thorn, piece of glass, or metal fragment may still be embedded in the tire.
If you reinstall the tube without removing the object, it can puncture the replacement almost immediately.
How to avoid it: Carefully inspect the outside and inside of the tire before installing a repaired or replacement tube. Check the rim tape as well, especially if the puncture appears on the side of the tube facing the rim.
2. Pinching the Inner Tube During Installation
An inner tube can become trapped between the tire bead and wheel rim during installation.
When you inflate the tire, the trapped section may be damaged, causing another flat.
This is particularly common when cyclists use tire levers to force the last section of a tight tire back onto the rim.
How to avoid it: Add a small amount of air to the tube before installation so it holds its shape. Use your hands to install the tire bead whenever possible, and inspect both sides of the rim before fully inflating.
3. Inflating the Tire to the Wrong Pressure
Incorrect tire pressure can contribute to flats and affect how your bike handles.
If the pressure is too low, the tire may compress excessively when you hit a pothole or sharp edge. On conventional inner-tube setups, this can lead to a pinch flat.
Excessive pressure can also create problems, particularly if it exceeds the limits of the tire or rim.
How to avoid it: Use a pump with a pressure gauge and follow the pressure limits specified by your tire and rim manufacturers. Your ideal riding pressure may vary depending on your weight, tire width, and riding surface.
4. Using the Wrong Replacement Inner Tube
Not every bicycle inner tube fits every tire.
A replacement tube needs to match your wheel diameter and support your tire width. Its valve must also be compatible with the rim and your pump.
Installing an unsuitable inner tube can make inflation difficult or contribute to installation problems.
How to avoid it: Check the size printed on your tire’s sidewall before purchasing a replacement tube. Confirm the supported size range, valve type, and valve length.
5. Failing to Seat the Tire Bead Properly
The tire bead is the reinforced edge of the tire that sits against the rim.
If the bead isn’t seated evenly, the tire may look uneven or develop a noticeable bulge when inflated.
An improperly seated tire can be unsafe to ride.
How to avoid it: Inflate the tire gradually and inspect the bead seating line on both sides of the wheel. If you notice an uneven section, stop, deflate the tire, and correct the problem before continuing.
6. Forgetting to Check the Brakes After Reinstalling the Wheel
Once you’ve repaired the tire, it’s easy to focus on getting back on the road and forget the final safety checks.
However, incorrectly installing the wheel or failing to reconnect a released rim brake can create a serious safety risk.
How to avoid it: Confirm that the wheel axle is secured correctly, spin the wheel to check clearance, and test both brakes before riding.
Taking a few extra minutes to inspect your repair can help prevent repeated punctures and make your next ride safer.
How to Prevent Flat Bike Tires
Although every cyclist experiences an occasional flat tire, a few simple maintenance habits can help reduce how often they happen.
Preventing punctures is generally easier than repairing them, especially when you’re far from home.
Here are six practical ways to reduce the risk of getting a flat bicycle tire.
1. Check Your Tire Pressure Regularly
Proper tire pressure is one of the most important factors in preventing pinch flats.
Tires naturally lose air over time, even when there isn’t a puncture.
Make it a habit to check your tires before longer rides and regularly during normal use.
Use a reliable pressure gauge rather than relying only on how firm the tire feels when squeezed.
Follow the manufacturer’s pressure limits and choose a suitable riding pressure for your tire size, weight, and terrain.
2. Inspect Your Tires for Wear and Damage
Over time, bicycle tires wear down from contact with roads, trails, and debris.
As the tread and casing deteriorate, the tire may become more vulnerable to punctures or structural damage.
Inspect your tires regularly for:
- Embedded glass, thorns, or sharp debris
- Deep cuts in the tread
- Cracks or damaged sidewalls
- Exposed casing threads
- Bulges or unusual tire deformation
- Excessively worn tread
If you notice serious casing damage or exposed structural material, replacing the tire may be necessary.
Don’t wait until a badly worn tire fails during a ride.
3. Avoid Sharp Objects and Road Debris
Glass, nails, metal fragments, and sharp stones are common causes of bicycle tire punctures.
Whenever possible, avoid riding through areas where debris has accumulated.
Pay particular attention to road edges, construction areas, and paths covered with broken glass or sharp stones.
You don’t need to constantly watch your front tire, but staying aware of the riding surface can help you avoid unnecessary damage.
Always prioritize safe, predictable riding over sudden movements to avoid a small obstacle.
4. Consider Puncture-Resistant Bicycle Tires
If you frequently experience punctures during commuting or recreational rides, puncture-resistant tires may be worth considering.
These tires often include additional protective material beneath the tread to reduce penetration from small sharp objects.
They can be particularly useful for cyclists who regularly ride on city streets or roads with debris.
However, puncture-resistant tires are not completely puncture-proof.
They may also be heavier or feel different from lighter performance-oriented tires.
Choose tires that match your bicycle, riding conditions, and personal priorities.
5. Keep Your Wheels and Rim Tape in Good Condition
Not every flat tire is caused by something on the road.
Damaged rim tape, exposed spoke holes, sharp rim edges, or problems with the wheel can also damage an inner tube.
Whenever you remove a tire, inspect the inside of the rim.
Make sure the rim tape is properly positioned, undamaged, and suitable for your wheel.
If you repeatedly find punctures on the rim-facing side of an inner tube, inspect the rim and rim tape carefully or ask a bicycle mechanic to examine them.
6. Carry a Basic Tire Repair Kit
Even with regular maintenance, unexpected punctures can still happen.
That’s why it’s a good idea to carry a small repair kit whenever you go cycling.
A basic repair kit should include:
- A compatible spare inner tube
- Two or three tire levers
- A portable bicycle pump
- A puncture patch kit
- Any tool needed to remove your wheel
These items can fit inside a small saddle bag or cycling backpack.
Having the right tools available can make a flat tire much less stressful, especially during longer rides.
Remember: Preventing flats isn’t about finding a tire that can never be punctured. It’s about maintaining your equipment, choosing suitable tires, and being prepared when something goes wrong.
Frequently Asked Questions About Flat Bike Tires
Here are answers to some common questions beginner cyclists have about fixing and preventing flat tires.
Can You Fix a Flat Bike Tire Without Removing the Wheel?
Yes, some inner-tube punctures can be patched without completely removing the wheel.
You may be able to lift one section of the tire bead, pull out the damaged portion of the inner tube, locate the puncture, and apply a patch.
However, this method can be inconvenient, particularly when it’s difficult to inspect the entire tire or access the damaged tube.
For beginners, removing the wheel is often easier because it provides better access and allows a more thorough inspection.
How Long Does It Take to Fix a Flat Bike Tire?
A basic inner-tube replacement can take around 10–20 minutes for someone familiar with the process.
If you’re a beginner, it may take 20–40 minutes or longer, especially if the tire is tight or you haven’t removed the wheel before.
Patching can require additional time for surface preparation, application, and any drying specified by the patch manufacturer.
With practice, the process usually becomes quicker and easier.
Can You Ride a Bike With a Flat Tire?
You should avoid riding a bicycle with a completely flat tire.
Without sufficient air pressure, the wheel rim may strike the ground, potentially damaging the rim, tire, and inner tube.
The bicycle may also become harder to control, particularly when turning or braking.
If your tire goes flat during a ride, stop somewhere safe and repair it before continuing. If you can’t repair it, arrange another way to transport the bicycle rather than riding on the flat tire.
How Much Does It Cost to Fix a Flat Bike Tire?
The cost depends on whether you repair the existing inner tube yourself, replace it, or visit a bicycle shop.
A basic patch kit often costs only a few dollars and can be used for multiple small punctures.
A standard replacement inner tube commonly costs around $5–$15 in the US, depending on size, valve type, and brand.
A bicycle shop will usually charge additional labor fees for replacing the tube. Prices vary by location and the complexity of wheel removal.
If you’re a regular cyclist, purchasing basic repair tools can save money over time.
Can You Repair a Tubeless Bike Tire the Same Way?
Not exactly.
Tubeless bicycle tires don’t use a conventional inner tube during normal operation. Instead, they rely on an airtight tire-and-rim system, often with liquid sealant inside.
Small punctures may seal automatically when the sealant reaches the damaged area.
For punctures that don’t seal, an appropriate tubeless repair plug may work, depending on the damage and the manufacturer’s instructions.
Some tubeless setups can also accept a compatible emergency inner tube, although additional preparation may be necessary.
The repair steps in this article are designed primarily for conventional tires with inner tubes. If your bicycle uses tubeless tires, follow the instructions for your particular tubeless system.
Final Thoughts: Be Prepared for Your Next Flat Tire
Getting a flat bike tire can be inconvenient, but it doesn’t have to ruin your day.
Once you understand how to fix a flat bike tire, you’ll have a useful skill that can save time, reduce repair costs, and give you more confidence on the road.
The process is straightforward: remove the wheel, find the puncture, inspect the tire, repair or replace the inner tube, and carefully reinstall everything.
Most importantly, always identify what caused the puncture before installing a repaired or replacement tube. This simple habit can help prevent another flat immediately after your repair.
Regular tire maintenance also makes a difference. Checking pressure, inspecting the tread, and replacing damaged tires can reduce the risk of unexpected problems.
And remember, you don’t need an expensive collection of tools to get started. A compatible spare inner tube, a pair of tire levers, and a reliable bicycle pump are enough to handle many common flat-tire situations.
Our final tip: Practice changing an inner tube at home before you experience a flat during a ride. That way, you’ll already know what to do when it matters.
Happy cycling, and ride safely!